
interactive timeline
THE HISTORY
OF PIXAR
Adobe Illustrator
HTML | SCSS
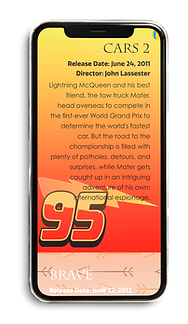
Working for Pixar is my dream job. At 22 years old, when asked what my favorite movie is, my answer is still Monster’s Inc. When tasked with creating a timeline, I eventually came up with the idea of ordering all the Pixar feature films. The goal was to code a static website using HTML and SCSS. It had to be interactive or have some sort of moving or dynamic component. I chose the font that the Pixar logo is written in for my titles and paired it with a simpler font for the body copy. The assignment only required to include ten events or points, however, there were 21 feature-length films at the time, and since then they have released 22. I have since added the 22nd film to the timeline. I knew copyright could be an issue with this project, but I made sure to create original backgrounds and graphics for each movie.


Working for Pixar is my dream job. At 22 years old, when asked what my favorite movie is, my answer is still Monster’s Inc. When tasked with creating a timeline, I eventually came up with the idea of ordering all the Pixar feature films. The goal was to code a static website using HTML and SCSS. It had to be interactive or have some sort of moving or dynamic component. I chose the font that the Pixar logo is written in for my titles and paired it with a simpler font for the body copy. The assignment only required to include ten events or points, however, there were 21 feature-length films at the time, and since then they have released 22. I have since added the 22nd film to the timeline. I knew copyright could be an issue with this project, but I made sure to create original backgrounds and graphics for each movie.


Creating the graphics was time-consuming, but very rewarding. I am very aware that object tracing in Illustrator is straight-up cheating and plagiarism. However, I have always been a fan of how it looks. Because of this, to create many of these vectors, I first used the pen tool to outline the basic shape that I wanted. I then image traced my reference, However, I then break down the image trace into the different shapes and shades that it produces. I manipulate the shapes to fit my outline I created and rearrange them in the way that I think looks best. I then use clipping masks to make sure all my lines are neat. I sometimes stretch out the shapes or compress them to get different textures. For example, in the image of the race car to reference Lightning McQueen, I stretched out the shapes to imply speed. When creating the texture of the van from Onward, I used the eyedropper tool quite a lot to get the different shade variations. Personally, the van and the boot from WALL-E are my two favorites that I created for the timeline.